Feeds:
Posts
Comments

Posts Tagged ‘step-by-step’

Back in the blustery, dull grey light in the UK after a fun week with everyone in Spain. These Muscatel Grapes seen in the sunny light in Spain where vibrant and translucent and I am struggling to keep the momentum going now I’m back in grey UK. Anyway I’ll share my progress to date with some photos from the trip.

These are three times life size and part of my “larger than Life’ series.


I’m laying down thin layers of colour and then gently dissolving with a minute amount of baby oil, too much and the colour comes off and smears, too little and the binder doesn’t dissolve.  this is all done with a pad of cotton wool, so high risk stuff as edges are extremely difficult to manipulate.


On the stalks I have embossed for the spots and then layered dry coloured pencil over the top.

Loads more layering and wiping!

More layering with baby oil and I can see the end in sight.


Read Full Post »

The final stages of the bulb drawing step-by-step.

20140306-093201.jpg
Stage 1
Outline drawing then applying colour with Pan Pastels. This gives me flexibility and a painterly control yo colour mixing. I use the posited sponge tip applicator.

20140306-093357.jpg
Stage 2
I mix the colour dry then apply solvent. This time I used a Letraset Promarker which leaves no residue on the paper surface and dries quickly as I will be following with the detail drawing in graphite.

20140306-093605.jpg
Stage 3
Colour blended and a final cleaning of the surface with a cotton bud soaked in solvent. Then I can start to apply the graphite detail.

20140306-093744.jpg
Stage 4
Pencil detail underway. I live this way of working as it gives me freedom with the application of colour but loads of fine detail as well.

Read Full Post »

The dates for studio workshops for the remainder of 2014 are now on the website and have been emailed out, sometimes repeatedly, (apologies if this has happened to you).
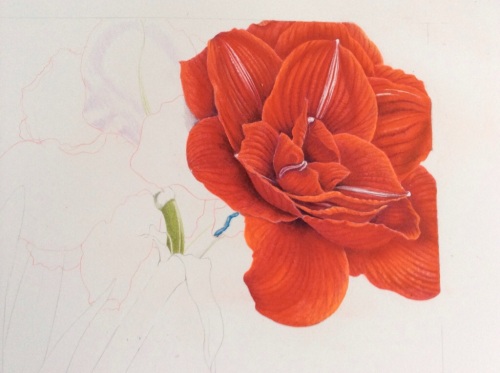
This luscious amaryllis has flowered in the studio and drawn me back to the drawing board (excuse the pun). I had been suffering from the winter doldrums,all this rain and mud and the light has been so dull.

20140211-074153.jpg
Inspired to do a slightly cut off composition I transferred my outline in colour onto the Fabriano 5 Classico then masked off the white stripes. As time and decent light are in short supply I plan to do this drawing with under painting using baby oil.

20140211-074622.jpg
After selecting an assortment of all my brightest mid reds from Faber Castell, Prismacolor, Luminance, and Tom Bow I started by quickly marking in the deep coloured veins and overlaying some brighter reds with a small amount of shade colour. Black Cherry and FC194. I then blend this in with the Copic marker filled with baby oil (this dispenses just the right amount. I work one petal at a time as I can then apply the dry layers into the slightly moist paper and the colours blend more easily and richly with no need for burnishing.

20140211-075157.jpg
I just managed to get the flower completed before it collapsed.

20140211-075301.jpg
I’ll keep you posted but as teaching starts in the studio today it may be a while. I have taken photos.

20140211-075407.jpg

Read Full Post »